So I've got this thing called a butt.
I mean, everyone has them, unless your like my husband, than you have to look real hard for his.
But mine, my butt, is very easy to find. In high school I had nicknames like J-Lo, the white Beyonce, and booty-booty. It's true.
I had this art class, and every time I would walk in front of a boy, all he would say was, "booty-booty-booty-booty." And you can bet your bottom dollar that when, "I Like Big Butts" came on at school dances, my friends would all look at me and say, "Giiiirl, this is your sooooonng!"
And trust me, I hate pant shopping. With every clothing geared toward the skinny jean look, you can bet that I run far far away to the sweats section. Because big baggy sweats are SO much sexier than tight skinny jeans on my big booty...
Ok, so maybe I need a personal stylist...and some help...
You see, with pregnancy, things on your body get bigger...and wider, because a baby needs room to grow. Some days I feel like I need to strap a "wide load" sign on my back side, and other days I feel like eating ding dongs. Either way I see it, watch out...
"Beeeeep...Beeeep...Beeeep."
Let's be honest, whether you eat healthy or not, at some point in mostly everyone's life, they have had a ding dong. I'm brought back to school lunches, where unwrapping a piece of tin foil was never so exciting just knowing there was circle of chocolate covered cream filled cake inside...
Yummm..
But now I'm a little for cautious and know that besides a delicious cake I also get nasty preservatives, unhealthy amounts of fat and sugar, additives, and yucky yucky stuff. This is a problem my friends...because I have been craving ding dongs like my butt depended on it.
Well, it was a problem, but not any more...
Homemade Diva (Ding) Dongs
*Vegan, Gluten Free, Dairy Free, Delicious*
Ingredients: (For the Cake) (Cake recipe adapted from here!)
1 c. Bob's gluten free flour (or whole wheat pastry for non GF)
1/4 c. cocoa powder
3/4 tsp. baking powder
3/4 tsp. baking soda
dash of salt
1 1/2 TB. cornstarch
1/4 c. melted coconut oil
1/4 c. applesauce (room temperature)
1/2 c. non dairy milk(room temperature)
1/4 c. maple syrup(room temperature)
2 tsp. vanilla
1/2 c. dates + 1/4 c. water pureed together to form a paste. (you can do this with a blender or food processor)
Ingredients: (For the Filling)
One can full fat coconut milk, top open and covered with plastic wrap, that has been sitting in the fridge over night
sweetener of choice-maple syrup, stevia, honey, agave, powdered sugar
Ingredients: (For the Coating) (Double amount for thicker coating)
1 -85% cocoa chocolate bar (you can do sweeter if you prefer, but I love dark chocolate) (3.5 ounces) (about 1/2 c. chocolate)
1/8 c. coconut oil
1 TB. sweetener of choice (I used agave) (optional)
Directions: (for the cake)
1. Preheat oven to 350. Mix dry ingredients together in one bowl, and wet ingredients together in another. Fold wet ingredients into the dry ingredients until incorporated. Don't overmix.
2. Spray a cake pan/square pan(8x8) etc. with non stick spray and pour batter into cake pan. Bake in oven for 20-25 minutes, or until center comes out clean. *Note: These aren't going to rise super high, so for a higher cake, you can use a smaller pan or use a cupcake muffin pan.)
3. Once cake is done and cooled and released from pan and placed on cookie sheet, use a glass/circle cookie cuter and cut out circles.
What you do with the leftover cake is up to you...Whether you eat it, or...eat it...or eat...It's up to you...
I promise...I won't judge. That would be hypocrytical.
4. Set aside and make filling.
Directions: For the Filling
1. After can of coconut has been sitting in the fridge overnight, remove it. With a spoon, scoop out the full fat cream that thickened overnight and put it in a bowl. Add a few TB. of your sweetener of choice and whisk together. Put back in the fridge while you make the chocolate coating.
Directions: For the Coating:
1. Add your chocolate, oil, and sweetener in a bowl that is sitting over a pot of simmering water. (double broiler.) Continue to stir until melted. Set aside. (You can also melt the chocolate in a microwave.)
Directions: For the assembly:
1. Take your cream filling and put it in a pastry bag fitted with any tip that has a smaller hole. I use this long skinny one that has gotten in a few fights with the garbage disposal.
You can also cut out a center of the ding dong if you would like, if you don't have a tip.
2. With your pastry bag, poke a hole in the cake a squeeze a bunch of cream into the cupcake. Squeeze hard...
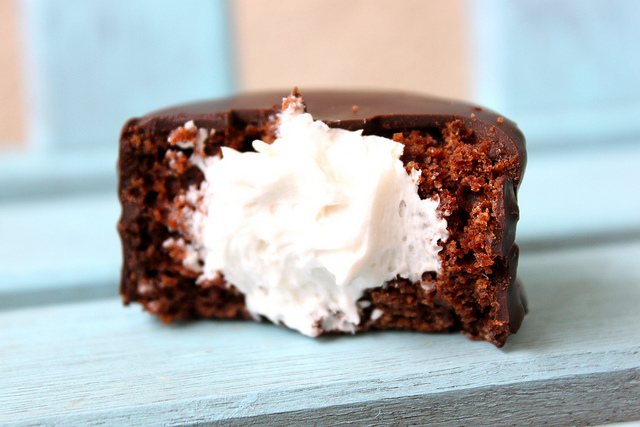
I like a lot of cream in the center of my Diva Dong.
You can also poke more than one hole in the cake so filling get's through out the middle.
Be Patient...We are almost done...
Once all the cupcakes are filled, it's time to coat them.
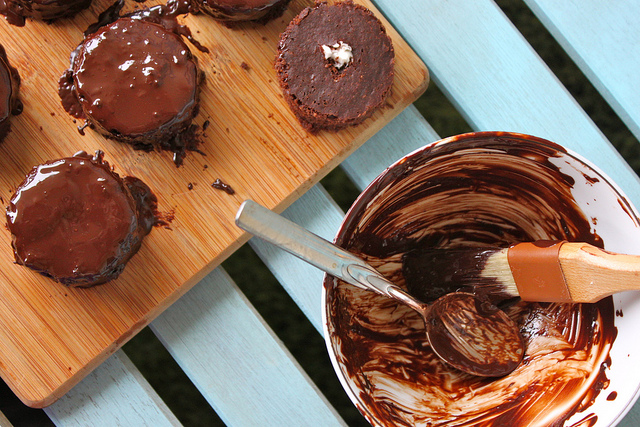
Make sure your chocolate is sitting in a deep bowl so it will be easy to dip them. Simply hold the bottom of the cake with two fingers and dip into the chocolate. Set down and let the chocolate drip down to coat the sides.
It's really messy, and not very pretty. You may have to lick your fingers a few times...darn.
If you feel it isn't coated enough around the bottom, take a spoon or cooking brush and brush some more chocolate coating around the cake.
Set in the fridge for about 10 minutes to let the chocolate set, and then they are ready to eat.
The chocolate will stay hardened after and you won't have to leave it in the refrigerator.
Look at all that creamy yummy goodness....
If I were making these for friends, I might have done a prettier job...But these were for me, my butt, and I...So I didn't care how they looked, just how they tasted...
And I can assure you...They tasted amazing.
And if you have leftover cream filling, well don't be shy...use it up!


